Showing posts with label 327 Engine. Show all posts

Tuesday, July 7, 2009

Missing V-8

1976 Nova

So I drove my Nova the other day, right before the fourth. Expecting a smooth ride, and it ran like crap. Missing, popping, back firing. Couldn't figure out what could of wrong, seemed off, very off.

327

So I came home and popped the hood, let it cool down, and started the search. Wow, one plug wire had melted through, the other had fell off, and the plug was loose. No one wonder it ran like crap, the V-8 was a missing V-6.

So I knew these plugs were a pain in the butt to get to. When I did the headers they were a night mare. Tight is an understatement, I'd like to insert a pedo comment but won't due to good taste.

So I have no room to work on them. The boots I had to use, and I use the terms boots loosely, suck. I can't use straight, I can't use 90 degree, or 45 degree, or any other boot you can think of, I can only use half wells. Now a half well is a boot that is cut in half, and the 90 degree half well boot work perfectly. By perfectly I mean about as well as a three wheeled fork truck. So that's what I have.

So I tried to snug the plug, no wrench would fit, or wratchet, or socket, no not even the all might buddy boy, will fit, not enough room. So I used rubber coated pliers and did the best I could. I wasn't happy so I made a "hook" wrench, it worked sort of, still hard to get it on the plug, but they are a bit tighter than finger tight now.

home made tool

home made tool

With the plugs tight I smushed the boots back on. To prevent heat I used those thermal flash dance leg sock looking things. So far so good, they say up to 1500 degrees. We will test that.

I noticed how fast my exhaust was getting hot.

Now I was bad, I set my base timing, and it ran fine, I figured it was advanced enough. So I decided late timing maybe super heating the exhaust. So I bumped it up a peg after about six beers. It was idling in park at 600 rpm. Which is a little slow for a 350, but I guess technically pretty slow on a 327. The 327 have that super short stroke, so they like a little more RPMs. So I cranked it up to about 10-9by advancing it. It was semi warm, so I am sure it will fall to about 900-850 when warmed up. So not too much overkill.

I do think I will get pinging from my vac advance now though. I hate vac advance so I may plug it. Insufferable little things that need constant fine tuning just for the sake of mileage.

I only drove it around the block, but it seems good to go, better than 6 cylinders anyway.

Drunk advance video, just kidding not really drunk.


Speaking of drinking, here is some fireworks at the fourth of July this year. I was excited about a chicken and tank.

Tuesday, May 5, 2009

Fuel Pump of a SBC

So lets go back to mechanic stuff, fishing was fun but it doesn't make the cars run. It's why the cars run. No not really.

So I started up my nova this year, and took her for a drive. I was disappointed when I got on it and put put put put vroom. I had a dead spot on acceleration.

1976 Nova

First suspect was timing. But it ran fine before I parked her for winter. Timing can't just change itself. A spring can break in the vacuum advance, but the base timing can't change itself, unless you have a a major mechanical fault.

So that was ruled out I started to suspect the carb. Maybe I some how bumped the jet screws, perhaps? Not likely, I did turn them up hair just in case. I have to turn them back down now that I think about it, it is running just a hair rich.

So I had another suspect, the choke. I drove the car for five minutes, came home the engine barely read 100 degrees and the choke was wide open. Perhaps it was adjusted too lean? Opening to fast starving the poor car of the fuel it desperately needed. Later as you will find out the gauge proved unreliable

But as I sat and thought about it, I realized something, something big. Since I put the 327 in I don't know how old the fuel pump is. No idea, could be original from 1968.

While I was at it I change the fuel filter. A long time ago I took the filter out of the tank, and carb, and just use an in line filter. I have no idea what the fuel filter is for actually. I take it in when I need a new one and get a new one. I think it was for a Toyota? I don't know, I had an issue with the filters, I bought the car for 250 or so bucks because no one could figure out what was wrong with it. It was also brown and rusty, missing a back bumper, but had four new tires. So I bought the car, replaced all kinds of things, only to find out the fuel filter in the carburetor was backwards (long story). I took it out threw it away, took the "net" filter out of the tank threw it away, and ended up with my Toyota in line filter, it was just laying around anyway.

Chevy small block, fuel pump location, SBC

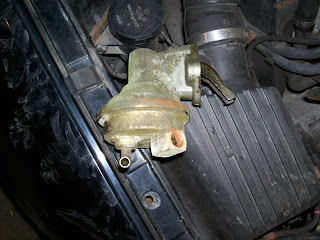
So I popped the new filter in, and installed the new fuel pump. Which is what this blog is about. The Fuel Pump. So the fuel pump is on the passenger side of the block. It is mounted with gasket, and two bolts. The pump has an arm on it which is ran by a rod inside the engine. The rod pushes down and the spring in the arm pushes the rod back up, then the rod pushes down, and so on.

fuel pump diagram, chevy small block, sbc

This motion over a diaphragm, back and forth, works like a syphon hose kind of, to draw the gas out the tank, through the filter, and into the carb.

Steps:
Remove fuel lines
Remove bolts
Remove Fuel pump
Easier to put something in front of the pump rod inside the engine now
Scrape the old gasket off
Fit new Gasket
Pack fuel pump arm cavity with grease
Fit new fuel pump (shove rod back up if you have to)
Tighten bolts
Hook up gas line
Start and watch for leaks

So I took mine off, it looked old. A word, or note. When you pull your SBC fuel pump out get a small screw driver, piece of wire, or whatever in the hole to catch the pump rod. The rod will slide all the way down, then you have to fight to get it up and in position for the next fuel pump to fit properly.

old chevy fuel pump, sbc

I let my rod drop. It took me longer to get it, shove it back up, and hold it there, than the putting the new fuel pump on. Damn rod, even tried my magnetic pick up tool because I couldn't get a screw driver in front of it.

Of course you have to unhook your hoses, but the new fuel pumps have lovely lettering that states "In" from the tank, and "Out" to the carb right on them.

The biggest problem is that damn rod. The bolt are easy to get to, the gasket easy to place, and the whole job is pretty easy. But a word of warning. Your standard SBC will not have enough crankcase pressure to kick the oil up to lube the pump. Pack the arm cavity with grease before installation.

1976 chevy nova, fuel pump lever

Many people will tell you this will "contaminate" the oil, but don't do it and you'll be changing the fuel pump again very soon. My old one barely had any remnants of grease left in it.

Also don't forget to scrape off your old gasket, and use a new one. If you don't' scrape it off you'll get gas spraying out everywhere. And gas is like gold, too expensive to throw away (that was lame).

Now to the electric versus mecnhanical fuel pump debate. Electric is much better, you can regulate your pressure, get better performance, and it is easier to install.

Know what? An electric fuel pump has left me stranded. They don't have to get weak first, they can just die, you can blow a fuse, and your car is DEAD until it is replaced of course.

A mechanical fuel pump has never left me stranded. They get weak, then they die. But you get notice. I like notice. Hey this is getting ready to go bad, time to change it.

I like that.

sbc, fuel pump

Not like our VW, which decided just not to start in parking lot one day. No grinding, no weak starts, just boom the starter dead. Would you rather have that? Or would you rather have a starter you could grind for a day or two, until you fix it?

That ends the electric versus mechanical fuel pump debate for me.

So I replaced the fuel pump. Easy job, two hoses, two bolts, and I took it for a drive. Runs excellent. I notice at this point to not trust my lying temp gauge. It rose to 100 or so degrees and froze, then jumped to 200 degrees and froze. I parked my car, and three hours later still said it was about 200. I tapped it and it fell to zero. Bad Gauge.

By the way, my car normally runs 190. 200 if I am in stop and go traffic, or sitting waiting. If I am on the highway 170 is about normal, so don't let the 200 freak you out.

So I have replaced my tach, which is another blog. But that ruled out my choke theory of opening before the engine was hot enough.

That's the story of me replacing the pump.

1976 chevy nova

Tips: Lube the arm, catch that rod, and scrape the old gasket off.

Tuesday, December 16, 2008

Chevy Small Block timing

SBC, Chevy Small Block Timing
Here is an older blog when I got a question about timing a Chevy small block. I also slapped some timing videos on the end of this post, on "how to set your timing videos" I made on youtube.

-B-

Ironically this question was asked at the same time I am getting ready to time my 327.

All Chevy’s are pretty much the same timing wise.
Check your coil and electrical to be sure and catch any future problems. Give the fuses a once over. Rotor should turn with crank. Should have twelve volts on the live from the coil when the key is on, and during crank. Negative coil wire should flash with crank (when on a tester), if it is on or off all the time module is bad. Check for spark at plug boot. Ok all that is good time to set cold timing. (I unhook the advance and plug it if not for anything other than to get the hose out of my way)

Take out your number 1 plug, firing order is 18436572, clockwise. Put your thumb over the plug hole and bump over, or manually crank the engine until air pushed out against your finger. That is the compression stroke. Crank until your timing tab is lined up with the timing mark, at 0. (if you have one the block if not you should mark the tdc once it is set) Either way if you have a timing tab or not, insert a soft wire, or dowel into the plug hole so it rests on the piston. As the piston comes up when you crank it the rod will push out, when it hits top that is top dead center for your number 1 cylinder. After tdc the pistion will start to drop again.

Even if you have a tab double check with the dowel or wire that 1 is really truly on Top Dead Center.

Hopefully it matched the tab, makes futures timing much easier, if not mark it.

Take the cap off the dizzy. See where the rotor is pointing. The metal piece that sticks up and touches the towers on the cap should pointing to the number 1 cyl tower on the cap. Now mark this on the dizzy, place the cap back on so a tower is lined up with the rotor. (Mark this! so 1 is right under 1, mark the cap, and dizzy) This is your new number 1 tower. Take a wire and put it on this tower run to your 1 plug.

Plugs are; driver’s side from front of the car 1-3-5-7. passenger from front to back 2-4-6-8, order from plug one on the dizzy is 1-8-4-3-6-5-7-2, so take wire one from tower one to plug one, then go around clockwise, tower 8, wire 8 to plug 8, and so one with tower 4, 3, 5 ect . . .
It doesn’t matter which tower is 1, as long as it goes to the number 1 cyl at TDC. Normally it is one of the front two, usually the one pointing toward the driver side, on newer HEI dizzy’s it was the one pointing toward the passenger side, but when you set this your self it doesn’t matter.
This is on cold timing now. If the carb is dry prime it through the "over flow" or breather tube in on carb, get some gas in the fuel bowl. Give it a turn, and see what you get.

The motor should run, maybe not the best, because the advance is still not set. Just sitting it
should be fine.

The next timing adjustment is the biggest pain. (You don’t need a timing light but it helps) For most small blocks to have peak performance you need to adjust the timing to fire before top dead center. This setting depends on the engine, but a good rule of thumb is it will fall into 6-10 degrees before TDC.

The easy way to do this (if you have a good ear this will be a breeze) is to loosen the cap and turn it, or warm the car/truck up, shut it off, loosen the distributor clap bolt, holding it in place, start the car. Now the rotor turns clockwise, so slightly, very slightly, turn the dizzy counter clockwise (the way you would turn a nut to loosen it) just turn it a hair. a full circle is 360, half is 180, a quarter is 45, so 6-10 is just a slight turn. Use your mark on the cap and dizzy as a reference.
Ok turn it until the engine sounds good. If you don’t have an ear for this, then you need a timing light. Take the light hook it up and follow the directions. The light is used to tell you when 1 is sparking by flashing. The flash should be shining on the timing tab to you can read the ’s on it. you adjust the dizzy until if flashes when your timing tab is 6-10, instead of 0.

Also hook up a tach so you can get the RPMs. Each engines are different, but a idle in park of 600-800 on a warm engine is usually decent, depending on the motor/performance parts. Again a good ear will help this. Adjust the timing and carb to get the rpm’s correct for your engine. The carb is a whole other beast, and there are too many to give a good guide here. But there is a fast idle screw, this should be #1 suspect if it ran fine before and timing is on. Get or find a guide to your carb and adjust accordingly if needed.

After this is set, it is all just tuning, which never ends.

Don’t forget to hook your vacuum advance back up. This won’t really affect idle, it kicks when you cruise to save you gas. So the vac advance is set later, you need to drive it and watch for flat spots or pinging then adjust the vac canister.


http://www.youtube.com/watch?v=BBywvhXLFZE

http://www.youtube.com/watch?v=yxyjA6v2G6Q

http://www.youtube.com/watch?v=9yqYDP7D_8M