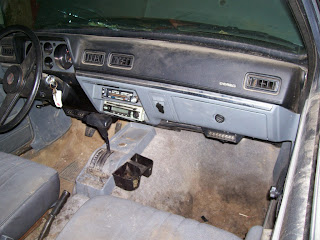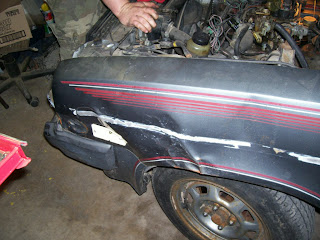
We bought a 86 Chevette, with body damage and busted windshield.


So now comes the fun part, starting to restore the chevette for the wife’s driving pleasure. She will be a cute little car, lots of work to do though. My first plan was to get her running good. She ran rough, really rough and weak. Had to push her up small hills. Compression checked out ok, but everything was in need of care.
One of the first tasks was rebuilding the carb. All kinds of un hooked vacuum lines startled me at first, but I fought through it. I pulled the carb off and started to rebuild it, no real issues, pretty easy rebuild. Worse part was seating the top again, it didn’t want to fit, a solenoid had to be put in just right to fit in the fuel bowl.


The second thing we did was to lose the AC pump. Dead weight. So we pulled the alternator, and took the pump off, the bracket came off later. With those gone it was time to get to the plugs. Pulled the plugs and replaced them. Stuck the old wires on so I could paint and not ruin the new ones.

I pulled the valve covers, the gaskets were bad, and painted the valve covers Chevy orange while I had them off. I threw them on with new gaskets and continued my tinkering.

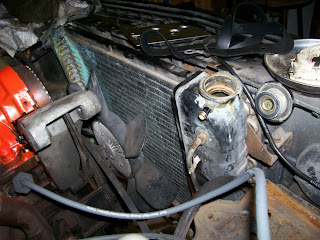
Found out the radiator was shot, lots of green corrosion on the top seam. We have a new one to put in. But I pulled that out to have more room to work. That top seam is a pain I’ve even tried welding them without success.

I also got to the brakes and found out the lovely hex bits I have rip through the old bolts like hot butter. So I have new ones on order, I may just take my angle grinder and gut the old caliper off. There is a brake leak somewhere, haven’t found it yet, mainly focusing on the engine, but had to jack it up and take the tires off anyway so looked the nonexistent pads and old calipers.

I did pull the old front shocks, which toppled to miniature size once removed, now we have pretty yellow gas shocks.

So the brakes are left to do, and so is replacing a wheel stud, both on order. I destroyed the stud taking a rusted on lug nut off the hard way.
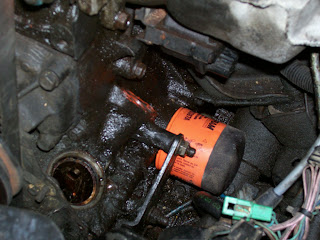
While under the car I changed the oil, didn’t look too bad, little runny and black, but better than I expected. The filter was easy to get to, under the driver’s side you can get a hand on it easy.

I also pulled the tranny pan, and changed the fluid. That was very easy, hardest part was getting the gasket that the auto parts store packaged folded in half to say flat enough to get the bolts started. The vac modulator on the other hand is a pain, I didn’t change that out, I have a new one, but it is waiting for me to get more motivated to cram my hands into the abyss of the transmission folds.

The exhaust is snapped off at the manifold. I found this out by tugging on it. I knew the car was loud, and to my surprise the exhaust came right out, bent up so bad the flared lip popped out the flange off the exhaust manifold.
I plan on rerunning the exhaust on it, hate cats. Catalytic convertors are only there to plug up and rust through. So I wasn’t heart broken when the exhaust came right off.
So the fluids have been changed. New wires, plugs, all the good stuff was all coming along.

I went to take the old cap off the dizzy, and got a wonderful surprise. I had been watching for something that would make car run weak, and up to this point my only suspect was vacuum lines. But as I went to remove the cap the whole dizzy turned. It wasn’t clamped down at all.

So I figure that was off time. Very likely with the cap dancing around like a drunk at a wedding. I found the clamp, easiest way to get to it is by going in under the driver side like you are reaching for the oil filter. After tightening it I decided to set the timing.
I pulled the #1 plug out. By the way the plugs run 1-2-3-4 from front of the engine (fan) to the back (firewall), the firing order clockwise around the cap is 1-3-4-2. Stamped right on the intake manifold.
I TDC #1 and pulled the cap, the rotor was about 10-15 degrees after the tower. So the dizzy isn’t even close to lining up. No matter how you rotate it the vac can still gets in the way from it being on.
I then decided, hey lets pull the dizzy, and move the rotor so I can make a tower line up with TDC. The thingy (sticker) under the hood states to time it 8 degreed before top dead, and it was at about 10 after.
So I took the clamp off and mightily pulled on the distributor. Didn’t come out. Hmmmm. Guess what I forgot about. The fuel pump rod. That’s right the dizzy turns and moves the fuel pump rod. So I tried and tried to get that damn rod up, and it wouldn’t budge.

After an hour of prying it with a screwdriver I knew there must be a better way. I took the fuel pump off, what the hell; I’m going to replace it anyway. After pulling the fuel pump the rod slides up in there so easily.

So I took the fuel pump out and slid the dizzy out. I put finger prints all over my nice new rotor while I was at it. At this point we went out to find a dizzy gasket, and fuel pump + gasket. They are on order. So it sits at TDC, waiting for the time I can drop the dizzy in and set the tower to the rotor.

While I have nothing else I could do, it was at this time I pulled the AC brackets. And I loosened the power steering pump to get the belts off. And changed the thermostat and gasket. With two days or so to wait on parts I’m going to get those calipers off, and see what else I can tear into.

But it has been fun, still working on project one, the engine and transmission. Next project is the brakes and suspension, though I’m picking at that while I can. Then exhaust, and then body work, leaving interior for the last.
I really think the timing made it run weak that and ½ the vacuum lines missing, someone else came and looked at it and was thinking about buying it, if things had been different I hoped they know how to set timing because I bet that’s what was wrong with it.
That’s my first blog of this project; stay tuned and become a follower to see how this ugly little beat up chevette that barely runs become


good on u for fixing the chevette. bought an 81 chevette few months back. pretty fun to drive around. theyre branded vauxhalls here though(new zealand) from england. same body but i think the carb & engine different. 1300cc instead of 1600 & 1800 over there.
ReplyDeletehey man bought an 86 got a few questions
ReplyDeleteAsk away.
ReplyDeleteChevette guy here.
ReplyDeleteThe driver's side floor is usually the first to go.
The fenders are easy to change but there is a bolt hidden up behind the dash, contortionist style.
High-wear parts on this car include master cylinder, brake pads, water pump, and timing belt.
Check the throttle shaft on the carb for play, it causes idle and stalling issues.
Those distributors are known for breaking at the roll pin near the bottom of the shaft, look for cracks there.
The master cylinders are known for leaking down the inside of the firewall, gathering near your feet. I have had to return as many as 3 master cylinders before getting a good one.
A good car though, my wife drives a red 87 2-door that we're restoring... and I'm building one with an SFI 3.4L V6 from a 94 Camaro in it ;)
maybe you can help me I'm working on an 87 2 door with a 1.6 had to replace the starter (what a pain) any way i had to wait a few days for parts and forgot where some of the vaccumn lines go she runs and drives great but has a really rough idle do you have any suggestions on which oes it could be?not good with computers here is my e-mail jacobmaclean@live.com thanks man nice to know i'm not the only one that fixes on the not so admirable classics. lol
ReplyDelete